Running TruSeq Amplicon
|
1
|
If you are analyzing TruSeq Custom Amplicon samples, and the manifest file is not yet uploaded to BaseSpace, perform the following: |
|
c
|
Select the manifest file for the panel you used in selection. |
|
2
|
Click the Apps button.  |
|
3
|
Find TruSeq Amplicon in the list and click the Launch button. |
|
4
|
If you see the End-User License Agreement and permissions, read them and click Accept if you agree. |
Now you can fill out the required fields in the TruSeq Amplicon input form.
|
5
|
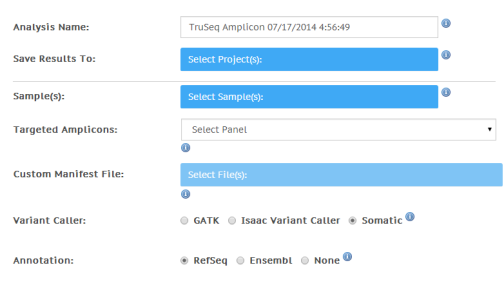
Analysis Name: Provide the analysis name. Default name is the app name with the date and time the app session was started. |
|
6
|
Save Results To: Select the project that stores the app results. |
|
7
|
Sample(s): Browse to the sample you want to analyze, and select the checkbox. You can select multiple samples. |
|
8
|
Targeted Amplicons: Select the panel you used for selection. |
|
9
|
Custom Manifest File: Select the TruSeq Custom Amplicon manifest file for analysis. This option is only available when Custom Panel is selected in the Targeted Amplicons drop-down list). |
|
10
|
Variant Caller: Choose which variant caller to use. |
Note
The Somatic Variant Caller is recommended for TruSeq Amplicon - Cancer Panel and TruSight Myeloid Sequencing Panel samples.
|
11
|
Annotation: Choose which gene and transcript annotation reference database to use. |
Figure 2 TruSeq Amplicon Input Form
The TruSeq Amplicon app now starts analyzing your sample. When completed, the status of the app session is automatically updated, and you receive an email.
|